Wednesday, January 30, 2013

The Scary Lint Monster : A DIY guide to cleaning the inside of your dryer

The View from inside your Dryer............WARNING: this might get a little scary
Yes, you're reminded of it every time you put the clothes in and take them out, but you just ignore it. Then, the overwhelming feelings of guilt and neglect come as you realize the performance of your dryer is not doing so great.  Finally, you force yourself to do this hairy and furry little job of pulling out the lint screen and scraping off the huge pile of what looks like a cashmere sweater and you leave it at that.

  However, we really do need to take a closer look at the fire hazards inside this little monster.  There are thinks lurking down there that we've never even seen, or perhaps lost. There are 3 pieces and each hide a lot of lint.  Don't be afraid of the idea of taking apart this little lint trap. It's easier than you think and probably a lot dirtier than you ever imagined.

What you'll need: A screwdriver, A bottle nipple brush (or other small brush with a long handle), a spray bottle with cleaner ( i used my tea tree oil spray), a dry cloth, and your vacuum. (And the ability to put part of your body inside the dryer)  If you are unable to squeeze inside far enough to see, JUST use a mirror to see what you're doing!

TIP:If you don't have a Whirlpool front load dryer; i'm not sure of the details, but it may be real similar, so look at your manual if in doubt, or like me....just tackle it yourself, just remember where everything goes back!


1. Take out the regular lint screen and set aside (clean now or last, it's up to you).
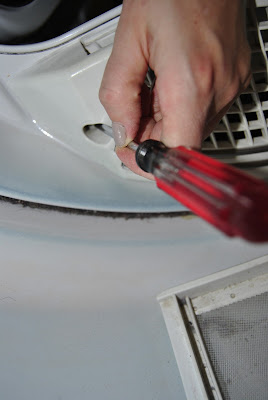
 Stick your head inside the dryer to locate the 3 casing's screws for the lint trap and  take them out. Lefty Loosey, Righty Tighty. Set the casing down in the dryer and screws onto a piece of tape, so they won't roll away.
When you take the screws out, the casing will be attached to some wires, which connects to the heating element. 
Caution: Don't try to take these out or touch with your screw driver, possible shocking hazard. Option 2. unplug dryer, use alternate light source if you're afraid you might touch electrical


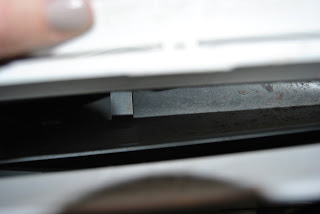
The metal strips are the thermostat/heat sensor element

Lay the casing down inside the dryer drum, it will reach


2.  Next, you'll see the interior casing with a lip that holds the dryer screen. It looks like this:

Locate the top of this piece and gently slide it down and out. It will simply pop out. Pay attention to all edges so you can pop it back into place later easily.


3.  Now, its time to start cleaning.  Take your brush and scoop out all the lint in all those tiny crevices, being careful not to directly touch the metal connectors.  However, there is lint trapped under the wires and deep down in the vent housing. 
Continue to remove lint as far down as you can reach and finish up with a damply sprayed cloth and remove final residue.

4.  Now, take a look at the drum and locate the circular lint guard that lines the back and front, by the door.  This is trapped with all kinds of lint. Just take your brush and scrub away. You'll be surprised.

5. Take each piece of the lint screen and casing and first clean with your brush, then wipe with damp cloth.  You'll need to clean out each square of the grid on the lint casing (i know, not fun)  

6. Pop the piece back in that looks like this: first locating the small lip it goes into and nestle down into the plastic holders with the writing facing you "insert lint screen" should be on top. Then, Pop goes the weasle.


7. Take the outer casing and place it back over the screw holes and screw them back in. Remember all 3!


8. Now, just wipe out the drum removing all excess lint. Then, vacuum out the small pieces.  If you vacuum out before- then you'll be cleaning out your filter on your vacuum....that's not fun either.
Now, your dryer can thank you, perform a little better and safer for you.
Note: There also should be general cleaning done in and around the dryer hose that attaches to the wall. Also, every 6 months you should pull the dryer out and clean underneath and behind to reduce the fire hazard there.

Like we all have time to do this(not really); however a good reminder when you have a little motivation and confidence,you'll have the peace of mind knowing that you're family is safer & plus you did it, girl. Awesome job!


Tuesday, January 22, 2013

DIY Cleaners & Skin Care

After several weeks of our family recovering from being sick over christmas, I finally got my house back in order and was able to finish a post i started in December.
After several requests for my recipes,  I decided to bring out my home keeping habits and share them with the masses, uh hum, few followers. If you're looking for someone who has actually used these recipes on not only my home, but used while cleaning homes in NW Arkansas. 
  After having so many skin allergies and allergic rhinitis, I kept searching for something to alleviate those post cleaning reactions. If you want to cut out chemicals in your home, this is what I've found to work.
I am also on the path to cutting down my  household costs to save for other important things.  So, the basic remedy was to go back to grandma's way of doing things, well, some of her ways....just a little more modern and with less elbow grease!  I remember NANA'S hands were always so dry and she'd always apologize for how scratchy her hands were.  She wouldn't use gloves and would soak 'rags' in scorching hot vinegar to clean with.  Do you know what that does to your manicure?
Along with Nana's old ways I purchased Martha Stewart's Homekeeping Handbook.  This was in investment in itself and a common go-to book.  I downsized my cleaners and everything(unless I forgot a couple) I use to prepare my cleaners, skin care and laundry items is in this picture:

Ok, so here's the break down...keep in mind that these are used in small quantities to make big batches and will last you a very long time.
You will need:
(from Sams Wholesale) 
Baking Soda, Vinegar, Member's Mark Papertowels
(Walmart)
Washing Soda, storage containers, Libman mop, Borax, peroxide, epsom Salt, cornstarch, baby power, Vitamin E Oil, table salt, Pure Crystals (not pictured, added scent to laundry) Oxi Clean (not pictured; used to save time, although there is a recipe for it to mix your own) Gloves

(Dollar Tree) set 3 scrub pads, washable duster, microfiber cloth, Spray bottles; not pictured is my cleaning caddy, used to carry all my supplies from room to room
(Dollar General)Refill scrub wand, hair conditioner
(Hobby Lobby) Vegetable Glycerin
(Kirks Natural Soap, online) Castille soap
(Lifesource4life.com) Tea Tree Oil
(Health Food Store) Coconut Oil soap and Barlean's Extra Virgin Oil Soap (not pitctured)
(Aldi) dish soap, olive oil, brown sugar, lemons 
(Used from household): old toothbrush, bottle brush, old dish cloths, towels; lavender oil from lavender plant in the back yard pictured in the vanilla extract container; recycled containers

Martha Stewart Home keeping Handbook; I love this book and use it for a quick reference

For my tile and wood laminate floors:
I use the Libman mop because you can mix your own solution in the tank and wash the mop pad, there are a couple more brands now available.  
Solution:   (depending on how messy the floor) 3:1 vinegar to water with a few drops of dish soap
You can use a few drops of tea tree oil, it has many properties and i will list those later.
If you can't stand the smell of vinegar, you can take some orange peels and soak them in a jar of vinegar for 2 weeks. This will make an orange scent you can add a tablespoon to the vinegar mix if it doesn't conflict with the scent of the dish soap.

All purpose spray

Distilled water
1 Tbsp dish soap
2-3 drops tea tree oil


Window/Glass Mirror Cleaner
1:1 Vinegar to Water
Use newspaper to dry mirrors

Laundry Detergent (Dry) Use 1 Tbsp. per load on front load machine, 2-3 tbsp. per load in top loader machine
Cost: around 2 cents per load
2 Cup Borax
2 Cups Washing Soda (not baking soda)
1 Bar Kirks castille soap 
I don't grate my soap, I use a chef's knife and make thin cuts across the bar of soap and it just slivers apart. Tip: put in freezer a few minutes to harden for cutting
Add shaved soap to food processor and spin it a few times until powdery; add the borax and washing soda and pulse a few times. Add to laundry container.  I double and triple this recipe and it makes for around 9-12 months of detergent.
I also added 1/2 cup of the Purex crystals and 1/2 cup of Oxi Clean to add an extra boost. I have a 1 year old, so we have a lot of heavy duty stains!


Laundry Detergent (Liquid) Use a gallon liquid dispenser and use regular amounts in HE and regular washer
1/2 Cup Borax
1 Cups Washing Soda (not baking soda)
1 Bar Kirks castille soap 
Using the same soap shaving technique as the dry mix, melt the bar of soap in 6 cups water on medium heat. Remove from heat and let it cool.
Using a 5 gallon bucket with a lid, pour soap mix into bucket. Add 6 more cups of distilled water, add Borax and Washing Soda, stir with hand held puree or spoon. Add 4 Gallons of distilled water. Let sit overnight with lid on. In the a.m. stir and disperse into 10 empty gallon recycled jugs with a funnel, then add the rest of the 5 gallons of water to the top of each gallon.

Tip: Some have found that the liquid is either goopy or doesn't set up into a gel consistency....  If it is goopy, shake the container (with lid on) and if it's watery, set it in the fridge for a while or wait longer in a cool area for it to gel.  Sometimes you have to experiment a little to get it to the right consistency.


Fabric Softener

Option 1:Use Vinegar in the softener dispenser in machine. You can also use vinegar in the bleach dispenser and add an extra rinse cycle for moldy towels instead of bleach after a cycle of soaking in 1/8 cup baking soda

Option 2: Take a wash cloth and spray with vinegar and throw into dryer

Option 3: Use your favorite scent conditioner. 
2 cups conditioner
3 cups vinegar
6 cups water
Shake gently in covered mixing container and add to liquid dispenser. Use regular amounts in machine dispenser or simply spray onto wash cloth and throw into dryer (this method would use less product!).

Deep cleaning power Solution for tubs, stains, etc.

Option 1:
Paste of Baking soda/vinegar OR hydrogen peroxide/baking soda
Mix into a paste and scrub away
Option 2:
Using the dish wand, fill half with vinegar, half with dish soap;
Tip: scub while you're in the shower

Baby Wipes (see separate post)

Adult/Toddler Wipes
Taking the baby wipes recipe only tweaking it for non baby use

1.5 Tbsp. Adult body wash/toddler,child bath soap
1 Tbsp. melted coconut oil
1-2 drops coconut oil soap
1 drop tea tree oil
2 cups distilled water
1/2 roll of paper towels 
Tip:(cut in half using a chef's knife, the serrated  knife tends to leave a shredded mess)

Mix the oils & soap first in your storage container. Add the water last and gently stir. Add your paper towel half and let it soak. Turn it over after 30 minutes and let soak another 30 minutes. When fully soaked, remove papertowel cardboard center.

If you want to refill into your empty potty wipes container, just unroll using an accordian style layering.  Store the overage into a ziplock back in the fridge. These tend to mold if not used within a week or so. The fridgeration helps maintain freshness!

Tip: These could also be used for facial wipes or by using a few more drops of tea tree oil, could be used for hand sanitizer wipes!

Air Sanitizer Freshener

Spray bottle with finer spray tip; the thick setting will leave water droplets
Distilled Water
5-10 drops tea tree oil

Oxi Clean fabric stain rescue
Spray stain with peroxide
sprinkle with baking soda
add dish soap and lightly spread with bottle brush
Soak for 20 min.
put in wash 

Skin Care and more recipes to come............like;
body wash
body scrub
facial cleanser
facial scrub
handmade liquid soap